

********************
Part Two

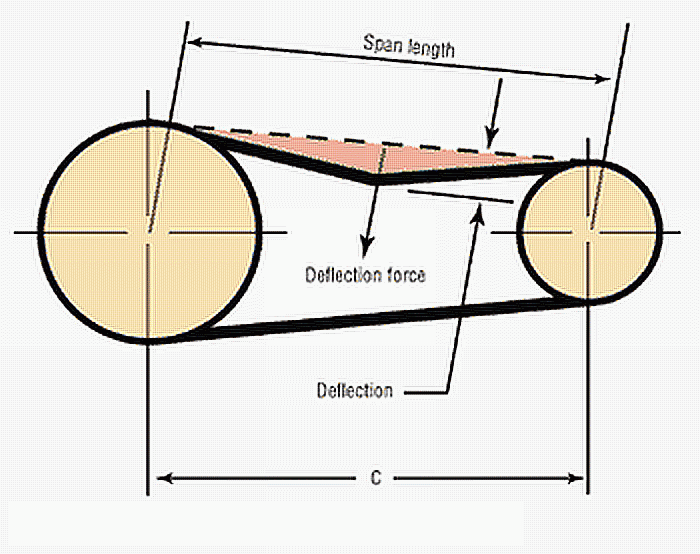
The Industry standard for tensioning V-belts is 1/64 inch deflection for every 1 inch of belt run red at the center point between the point of exit on one pulley to the point of entry on the other pulley, on the longest run of the belt (span length). The standard example is for a 32 inch run, there should be 1/2 (.5) inch deflection. That means that for a 16 inch run the deflection would be 1/4 (.25) inch. A lot closer to what is used on an auto engine.
The calculated tension range at which belts should be installed depends on the drive components, and the load and speed of the drive. The belt manufacturer's recommendations should be followed to determine the calculated installation tension values. The ideal tension for a V-belt drive is the lowest tension at which the belt will not slip at the highest load condition.
That begs the question of what the highest load means. As an example lets use the alternator, but all of the accessories are the same, because for the maximum load, all of them have to be operating and pulling the engine R.P.M down.
These tests will be for the individual accessory and for all of them together. Testing the alternator belt means just turning all of the electrical devices on when the engine is cold and all of the other accessories in turn.
For extreme testing, start the engine cold so the belts are cold.
For newly installed and tensioned V-belts, a run-in procedure is recommended. This process consists of starting the drive, letting it run under full load and then stopping, checking and retensioning to the recommended values. Running belts under full load allows them to seat themselves into the grooves.
For each belt: Use your thumb or fingernail to find the exit and entry points between the corresponding pulleys. It's easy to find, when your nail finds the high point of the belt, mark that point on the pulleys with the marker pen. Determine the long run of the belt with the tape measure.
First the Ideal:
The math is simple. Because the margin of error is so small (+ or - 1/128 inch from half of the whole inch), round any length up or down to the nearest whole number. For a run of let's say 14 1/2 inches go either way. Multiply the length of the run by 1/64 using the standard method of multiplying a whole number by a fraction. That gives the ideal deflection amount.
Now the Practical:
Since the margin of error is so small, and because by the time everything is tightened down the actual deflection will probably change, it's more practical to get the deflection as close to the calculated value as possible, and not worry about it, as long as the belt doesn't slip or conversly, approaches "zero" inch deflection (a super tight, no deflection condition). The Practical Rule is: "Use the lowest tension that drives the maximum load without slippage". Using flat washers between the bolt head and/or nut at the tightening point can minimize deflection changes caused by tightening the bolts to specs.
Tools needed:
Measure the distance with the steel tape measure and record it and draw a diagram of the belt and pulleys. Use exact measurements for this. Determine the center point and record it.
Round off the length measurement to the nearest whole inch and calculate the ideal deflection for that length. Put this into your diagram.
With a known flat straight edge, place it along the belts longest run (span length) and mark it at the point of belt entry and exit. Make a mark at the exact center point as determined above (for example, 14 1/2 inches is 7 and 1/4 inches). You will be checking the deflection with the pocket ruler. With the pocket ruler centered and steadied on the straight edge push its top end down onto the belt. Hold it there and remove it to see what it says. record this in your notes. Do it again but push down on the belt as far as you can and record this measurement. Subtract the first from the second and this is that belts actual deflection. Remember that your trying to get to the ideal deflection. The standard example is for a 32 inch run, there should be 1/2 (.5) inch deflection.
It may be very hard for you to see it straight on in place. With your helper adjusting the tension have him also tighten down the adjusting bolt. Re-check the deflection to get it as close as possible to the ideal. Do it as many times as you want to get to the point your happy with.
NOTE: New belts should always be re-checked and adjusted after about one week of use. When it's all over and done, you'll have a record and diagram of each belt/pulley combination with values for length and deflection. You will be able to refer to these anytime in the future.
**********************
Part 3 will attempt to list all belts for all engines and their accessories with the major manufacturers. This won't be finished for awhile, so please check back often.
**********************